Installation of OpenCV in windows:
Let us first install and see the applications later.
I am using windows platform so I am going to discuss here installation
in windows using Microsoft visual studio.
Required to download:
1. OpenCV (click)
2. Microsoft visual studio.
I use Microsoft visual studio ultimate in my programs.
I will discuss step by step procedure to install. I will try
to make it as simple as possible.
Step 1: (Download required components.)
- Download OpenCV. It is an open source. You can download it by
clicking on it.
- I prefer using Microsoft visual studio ultimate.
Step 2: (Extracting OpenCV to a location)
- After downloading, go to the folder, right click on it and
click on run as administrator.
- Now select the location where you need to extract (Here I
extracted to C:\ ) then click extract.
It will take some minutes for extraction into the selected
folder.
After extraction, name of the folder will be OpenCV. To avoid confusion while setting path change
the name of folder to something else.(Let “OpenCV243”).
Now install Microsoft visual studio (Ignore if you have).
Step 3: (Set the path.)
Follow the link of steps to set path.
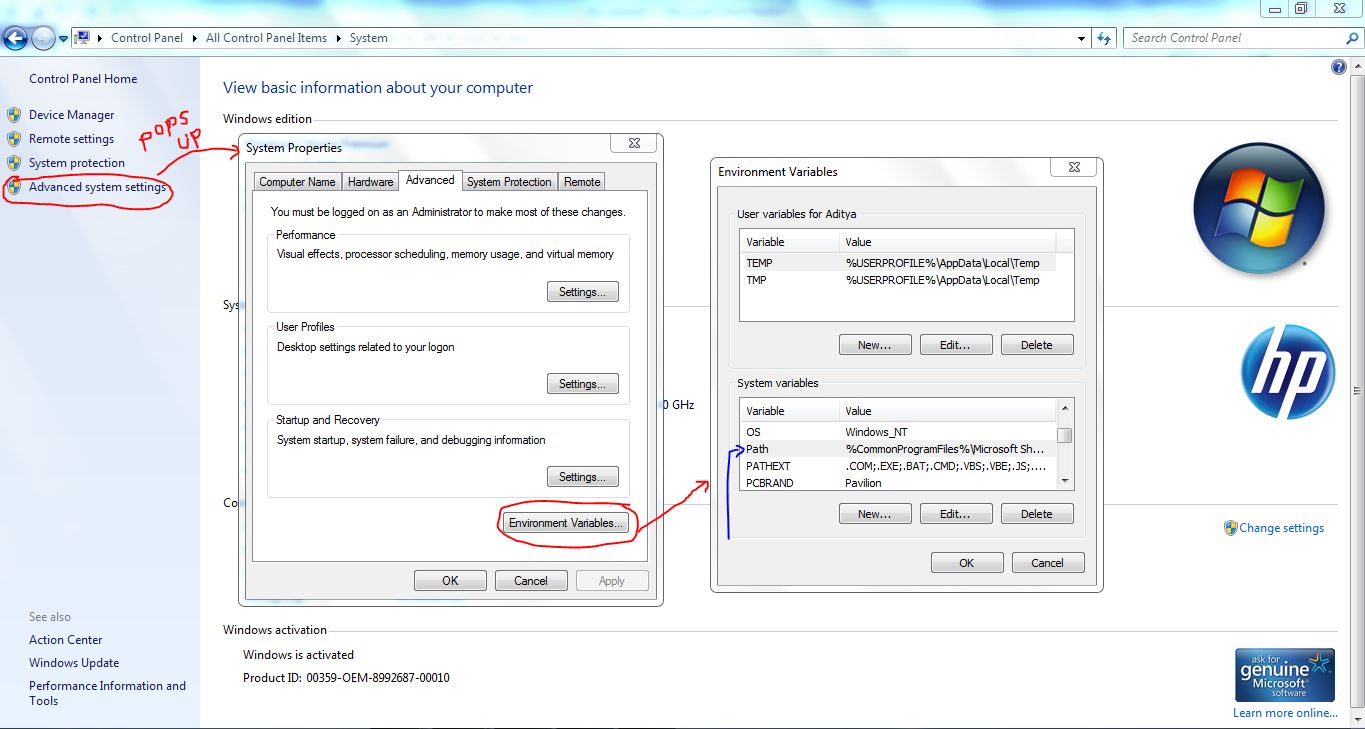
Start à
Control panel à
System à
Advanced system settings
Advanced system settings à
Environment Variables àPATH
(Search for variable PATH in System variable inside Environmental Variables
window)
Double click on the system variable PATH to edit it.
When edit system variable window pops up add C:\OpenCv243\build\x86\vc10\bin;
System variable value, i.e. the path added should be ended
with semicolon (;).
To know why this is done, go to the location that is added
to the variable. It contains all the .dll files which are to be added for the
program to run.
Step 4: (Creating property sheet in Microsoft Visual Studio)
Here we create a property sheet which should be created in
any program we write further in OpenCV. But a property sheet which was created
can be added to any program. So creating property sheet is crucial in the way
we write the program.
Open Microsoft Visual Studio
Create a Win32 console application. Write a unique name for
your New Project. Click OK.
Click Next..
Check for
Application type: Console application
Additional options: Empty project
Click Finish.
Now open the Property manager à
Right click on Debug àAdd
new property sheet.
Name the Property sheet and click Add.
There are three places where you should link locations or add.
1.C/C++ à Additional include directories à Edit à Add(C:\OpenCv243\build\include)
2. Linker à
Additional Library Directories à
Edit à
Add (C:\OpenCv243\build\x86\vc10\lib)
3. Linker à input à Additional
Dependencies à
Edit, Add
opencv_calib3d243d.lib;
opencv_contrib243d.lib;
opencv_core243d.lib;
opencv_features2d243d.lib;
opencv_flann243d.lib;
opencv_gpu243d.lib;
opencv_haartraining_engined.lib;
opencv_highgui243d.lib;
opencv_imgproc243d.lib;
opencv_legacy243d.lib;
opencv_ml243d.lib;
opencv_nonfree243d.lib;
opencv_objdetect243d.lib;
opencv_photo243d.lib;
opencv_stitching243d.lib;
opencv_ts243d.lib;
opencv_video243d.lib;
opencv_videostab243d.lib;
Note: This changes when your version changes. These are for OpenCV 2.4.3 as you can see 243d everywhere.
Now click OK. Your New Property Sheet is created now.
To write program go to
Solution Explorer à
Right click on Source Files à
Add new Item
We write the program in C/C++ so select C++ file. Name it
and click Add. Now you are ready to write Program in OpenCV.